Recipe Book

My very own recipe compilation of Anti inflammatory and healing foods and meals. Nutrient dense meals ready to rock your mind, body and kitchen. With some helpful info along the way...

Search by the tags for a quick list of meals that suit your lifestyle.

Turmeric Curry - Paleo, Keto

IMG_0612.JPG

THE COLD WEATHER IS HERE! HELLO CURRY! HELLO STEW! HELLO CASSEROLE!!!!!! I'VE MISSED YOU! (Totally was not meat to rhyme but I'm so glad it did)

This recipe is seriously so delicious, and even better, it is really good for you. We all know turmeric, and we all know how good it is for you! If you need a refresher though on why turmeric is the bee's knees, then check THIS LINK out!

There are a lot of misconceptions about the Ketogenic Diet. Most people think that the keto diet is eating tons and tons of fats, and that's simply not true. There are two types of Ketogenic Diet and both serve a completely different purpose. 

Medicinal Ketosis is a ketogenic diet that was created to aid at improving cognitive function in those with impaired mental function. The brain is 80% fat, and when consuming high fat in a ketogenic diet, it provides the brain with a long and stable fuel source for the brain to function. It has proven beneficial for some epileptic patients in reducing seizures, and aiding memory retention in some Alzheimer's patients. A recent study confirmed that some alzheimers patients showed an immediate increase in memory retention after consuming just one tablespoon of coconut oil. 

Pretty impressive hey?! However eating large amounts of fat is not really condusive of fat loss when it comes to people using this diet for weight loss. The idea of the Ketogenic Diet is that your body is able to burn fat for energy - ergo - when you run out of consumed fat, your body will begin to access stored body fats for energy. Well - if you're consuming large quantities of fat, that doesn't always happen. Some see weight loss, and some see weight gain and some, well they see no difference at all! And while some see great results at the start, it often leaves people in a weight loss 'stall' because they're eating too much fat to give their body the opportunity to switch over to burn the bodies sources. 

However, there are some really large down sides to following a high fat ketogenic diet for long periods of time. For one, it can be hard on the kidneys in those who have impaired kidney function, and is also proven to cause issues with eye sight in others as it can constrict arteries. And of course, we can't forget that not consuming adequate protein will result in Lean Body Mass wastage, Organ Wastage and hair falling out. There is no guarantee the weight you are losing on a high fat ketogenic diet is actually fat loss, because without adequate protein intake, the body will burn muscle, and if this goes on long enough - eventually Organs. You can read more about the science of high fat vs high protein ketogenic diets at www.ketogains.com

Then there's Keto for weight loss, which is Nutritional Ketosis. This ketogenic diet was created for weight loss, to ensure that the weight that is lost is actually FAT loss, and not muscle wastage. Nutritional Ketosis is low carb, moderate fat and high protein and operates on the principle of 'carbs as a limit, protein as a goal and fat as a lever'. This means you eat adequate protein to ensure no LBM wastage, minimal carbs to ensure ketosis, and then moderate fat which you can use as a lever. If you eat less fat in a day, then your body will switch to burning stored body fat sooner, if you consume more fat, then your body will be delayed in burning body fat. 

In addition, Protein holds more nutritional density than Fat. This means that you are getting more micronutrients and nourishing your body more thoroughly on a high protein keto diet, than you are on a high fat keto diet. Remember - just because you are thin, it doesn't mean you are healthy. For people wanting to lose weight, the goal should be regaining health just as much as it should be fat loss. 

So there are the basics of the ketogenic diet. I should actually just do a keto blog - which I will get around to one day. But for now, this is why one serve of this meal is 3 chicken drumsticks. Protein. 

In order to get your macros for this meal, you need to put your thinking cap on, and admittedly some of this will be a guessing game when it comes to the sauce. For myself, I entered 'one serve' of coconut cream into my macro tracker, and then made sure I put minimal sauce on my plate just to be safe. 

So! get those scales ready, and get ready for some serious delicious ness. As per usual, write a comment below and let me know your thoughts! 

If you are after some support/more information for a ketogenic diet, join the facebook group 'Wholefood Keto' - just click HERE.


Recipe

Time - 1.5 hrs -

Serves - 2 -


What you need:

Casserole Pot

Tablespoon Coconut Oil

6 Chicken Drumsticks

1 Red Onion

1 Small/Medium Sweet Potato

1 can AYAM Coconut Cream

1 flat teaspoon Turmeric (Higher Cucurmin % the better)

1 flat teaspoon Curry Powder

1/2 teaspoon Cumin

1 teaspoon Oregano

2 cloves Garlic

1/2 Stalk Lemongrass thinly sliced 

juice of 1/2 Lemon

1 Bunch Broccolini 

Salt & Pepper


What to do:

Heat the casserole pot, add coconut oil, onion & Garlic and saute until tender and translucent. 

Pour in coconut cream, and add Oregano, Cumin, Curry Powder, Turmeric and Black Pepper and stir until completely yellow. Add the chicken drumsticks, sweet potato and lemon grass and mix until thoroughly coated.

Let simmer for 40 minutes with the lid on.  

Cut broccolini into thirds and add to the pot and keep the lid off and simmer for an additional 15 minutes. Add Lemon Juice and salt and pepper to taste and serve. 

One Serve contains 3 chicken drumsticks, half a bunch of broccolini which is about 3-4 spears, and around 40 grams sweet potato depending on the size of the sweet potato you choose. 

Delish!

fullsizeoutput_2a.jpeg


Sugar Free Apple Crumble - Paleo

IMG_0974 2.JPG

Pretty excited about this recipe to be completely honest. 

As Australia spins away from the sun, the colder months dawn upon us which is the prime time for delicious comfort foods! So, with my feet in slippers, and a big baggy oversized jumper snuggled up on the couch with my pot of adaptogen tea - I say - Bring on the seasons of Curries, Stews and Roasts, and most important - Baked Deserts! Warm, delicious, and now, Healthy!

Apple Crumble always reminds me of Autumn. I'm not sure why. Perhaps its the beautiful burnt red colour of pink lady apples, or that Autumn has warm days and cold days - and apples can be eaten warm or cold. Perhaps its the warmth and comfort that cinnamon and nutmeg bring on a cold night when you're snuggled up on the couch with your loved ones. I really don't know why. There are so many reasons. But one thing I do know is that Autumn is my favourite time of year, for the beautiful colour of the trees, for the crisp air thats so refreshing after a long hot summer and for the amazing comfort foods that are starting to be cooked in everyone's kitchens as we head away from salads which were so perfect in the heat. 

Having 3 young kids (a 3 year old and 1 year old twins - my god where did this year go?) I am always trying to find new foods to introduce them too that not only are delicious and people pleasers, but also foods that hold dense nutritional value. We are a sugar free household here and the only sugars we have available in our pantry are Manuka Honey, and fruit. Manuka Honey I will cook with when there is something exciting coming up and I decide to bake something special, otherwise we leave it for colds and flus. So suffice to say, sugar, no one in this house really eats it. 

This is why I am so excited to present this recipe to you! This desert (although my tribe ate it for breakfast) is the perfect example of not needing sugar or a lot of sweetness to make something delicious! The apples and sultanas in this recipe make it sweet enough that no added sugars are needed, and I think you'll agree! But - if you do wish for some sweetness - you can always drizzle with a little bit of Honey or your sweetener of choice if you have a bit more of a sweet tooth! Just keep it Refined Sugar Free is all I ask. 

This recipe is also posted in our baby section because this contains all good things that are great for breakky times for little bellies! Filled with good fats, Fruit and Fibre, this is great for breakfast or deserts, for little bellies and for big ones. 

So give it a go and let me know your thoughts in the comments below!


Recipe

Time - 1 hr -

Serves - 6 -


What you need:

Pie Dish

-Filling-

2 Pink Lady Apples Cored and sliced thin

1 Teaspoon Cinnamon

1/4 Grated Nutmeg Pod

1 Teaspoon Lemon Juice

1/2 Vanilla Bean Pod

Crumble

1 Cup Mixed Nuts

1 Tablespoon Coconut Flour

1/4 Shredded Coconut

2 Tablespoons Sultanas

3/4 Teaspoon Cinnamon 

1/4 Grated Nutmeg Pod

1/2 Vanilla Pod 

2 Tablespoons Melted Ghee (you can also sub for coconut Oil)


What to do:

Preheat your oven to 200 degrees C

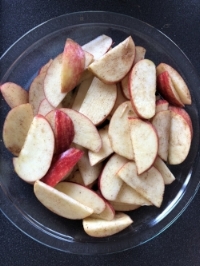
Slice your Apples into thin slices (The thinner they are the quicker they'll cook) and place them in a mixing bowl with the cinnamon, nutmeg, lemon juice and Vanilla. Stir until all the apple pieces are covered in the spices and lemon juice. Let this sit while you prepare the crumb. 

In a food processor place all of the ingredients EXCEPT THE GHEE, in the food processor and pulse until crumb like. If you blend until the sultanas are chopped through, the nuts release their oil and makes it not very crumbly, so I choose to only pulse until the nuts are crumbs, which means the sultanas are left somewhat whole. I feel it gives a nicer texture. 

Melt your ghee on the stove. 

Pour the melted ghee into the crumb mixture and mix through until all combined.

IMG_2324.JPG

In your pie dish ( I used a pyrex dish ) Lay the apple slices out in a thin layer, and then keep layering until all the slices are in the dish ( I went for a throw them in and move them around with my hand approach). Pour the crumb onto the apple slices, and spread out with the back of a wooden spoon. Once the pie is covered, firmly press the crumb down with your hands.

Cover with Foil and place into the pre heated oven for 20 minutes.

After 20 minutes, take the foil off, and place back in the oven for a further 10 minutes to brown. 

Serve with Delicious Coconut Yoghurt.

IMG_4033.JPG
fullsizeoutput_2a.jpeg


Electrolyte Brownies - Paleo, Keto

FhKwkmH1SyyH2xwmwTwUiA.jpg

Heyoooo,

Been a little while since my last recipe blog. Life has been HECTIC! Small people have been sick, we have had old people sick (by old I mean me) Uni restarting, and a bunch of getting out and about in this beautiful sunshine we have had! So I do apologise that we have been slightly MIA!

On a brighter note, we have created a new Facebook Group for people following a Paleo Ketogenic Diet, or for those of you that have heard a bit about the term 'Keto Diet' lately but really aren't sure about it and would like some information. So feel free to join the facebook group if you would like any questions you have, answered, or would like some recipes, or to share your meals and journey in return. You can access the group HERE and request to join. 

So if you are a keto veteran, you will know how important it is to maintain electrolytes while in Ketosis, however if you are new to Keto, you might not really understand why, and being without adequate electrolytes can be really dangerous as well as make you feel like shit. 

When the body runs on Carbohydrates, the body stores carbohydrate sugar in your cells as glycogen, and it stores the glycogen with water. The water, holds magnesium, potassium and sodium. When you are in Ketosis, or following a ketogenic diet where the fuel source is Fat and protein, not carbs, your cells do not have glycogen stores, which also means no water stores. This means that you need to up your intake of electrolytes (supplemented daily) to make sure you are getting adequate electrolytes for organ function as you urinate out your electrolyte stores rather quickly. 

For some, this is easy. Downing a big old glass of salt water 2-3 times a day is no biggy and generally speaking, we get enough potassium through the vegetables we eat in our carbohydrate allowance. Then all thats left is to take a bioavailable magnesium Supplement 2-3 times a day. For others though - the thought of downing salt water is gut wrenching, and lets be honest and say that not all humans have a palate that loves all the green leafies that we need to get our potassium in. 

This is why I decided to put on my thinking cap and make something that contains electrolytes. By electrolytes, I mean Sodium, Potassium and Magnesium but the trick was trying to make it into a recipe that most people find inviting. And this is when the Electrolyte Brownie was born. 

I think we all agree that Nutella is a bloody win. It tastes amazing, it smells amazing, and is just all around, amazing. I'm pretty sure 80% of us would be happy to bathe in it, but we hold that dream in our heads and hearts. Well I do, some of you may have made that a reality, and for that, I don my cap to you good sir. Furthermore, the Nutella that we are all so addicted to is filled with refined sugars and vegetable fats which make it a heart attack waiting to happen as well as spiking our blood sugars which send us on an eventual downward spiral into fatigue and mood swings. So - you will be super excited to learn that this brownie... this, electrolyte, gut loving, good for you brownie, tastes like NUTELLA! A Nutella that you can feel completely Guilt Free about, and that you can eat as much of as you want, provided it fits your macros. 

The recommended potassium intake for the ketogenic diet is 1,000-3,500mg daily. Hazelnuts are beautifully high in wonderful micronutrients, but the most relevant to this recipe is that they are high in Potassium. Generally speaking, the potassium content in 100g Hazelnuts is around 755 - 658 mg. Now while you're probably not going to sit down and have at 100g of hazelnuts, you will get an amazing dose if you manage to find a hazelnut spread, or you can just choose to swap in another nut butter and then crush a decent amount of hazelnuts and mix them through. All nuts contain potassium to some degree, but hazelnuts are quite high in comparison.. and hey they make Nutella so they gotta be good right?

Using Pure Cocoa powder, Raw Cacao and Avocado as the base for this brownie recipe is really what renders this brownie 'electrolyte' filled. Cocoa and Avocado are an amazing source of potassium as well as the hazelnuts, and Cacao is a wonderful source of Magnesium. In Addition, if you have food grade Magnesium Flakes, you can add them to the mix. They will dissolve and increase the magnesium content of the brownies again. For food grade magnesium flakes, I use Elektra. You can buy these flakes HERE. I also consume a half teaspoon of elektra flakes with a half teaspoon of Himalayan Salt three times a day to boost my magnesium intake as well as taking a Magnesium Glycinate supplement.

Sodium intake in a ketogenic diet is also extremely important. To keep these these brownies palatable and not savoury, we haven't added much sodium, so admittedly that's the most limited of the electrolytes in this recipe. But sodium is more easily available and easy to consume on your other foods, so it isn't too much of an issue.

Please remember that these aren't proper brownies, so don't be expecting miracles. They taste nice enough to eat, but you need to go into these brownies with an open mind. Sounds weird I know, but you will only be disappointed if you expect them to be like normal brownies. They serve a purpose, and while they're pleasant to eat, please remember that their purpose is built before the flavour.

So lets kick off the recipe. As per usual, if you give the recipe a try, let me know how you go. Always interested to hear your thoughts!

Biome Eco Stores - Zero Waste, Toxin Free, Ethical Choices

Recipe

Serves - 4 - 5 -

Time - 15 m - 30 m Baking -


Ingredients:


(For the Brownie)

2 Avocados

4 Tablespoons Pure Organic Cocoa

2 Tablespoons Raw Organic Cacao

2 Tablespoons Hazelnut Nut Butter ( Or Nut Butter of Choice )

100g Hazelnuts chopped (if you don't use Hazelnut Butter)

1 Tablespoon Coconut Flour

3 Tablespoons Organic Cold Pressed Virgin Coconut Oil ( Melted or room Temp )

1 Teaspoon Cinnamon

1 Teaspoon Nutmeg

1 Vanilla Pod

1 Teaspoon Xylitol

4 Organic Free Range Eggs

1/4 Cup Unsweetened Almond Milk

1/2 Teaspoon Baking Soda

1/2 Teaspoon Baking Powder

Pinch of Salt


(For the Icing)

2 Tablespoons Hazelnut Butter or nut butter of Choice

1 Tablespoon Organic Cold Pressed Virgin Coconut Oil ( Melted or Room Temp )

1 Tablespoon of Unsweetened Almond Milk

2 Tablespoons Organic Cocoa

2 Tablespoons Organic Raw Cacao

1 Teaspoon Vanilla

1 Teaspoon Elektra Magnesium Flakes

1 Teaspoon Xylitol

Pinch of Salt


What to do:

In a high powered processor ( I used the food processor attachment on my Nutri ninja ), place all the wet ingredients and blitz until thoroughly combined and no lumps remain in the avocado. You may need to use a spatula to wipe down the side of the bowl and repeat the process to make sure it is thoroughly combined.

Pre heat oven to 180 degrees celsius and grease any type of tray. I used a round tray with a removable bottom. 

Place all dry ingredients in the processor and blitz again until thoroughly combined. 

Pour into the greased tray, and place it into the preheated oven for around 30 minutes or until firm to the touch. 


While Baking, clean the processor and place all ingredients for the Icing in and blitz until thoroughly combined. You need to make sure the Magnesium Flakes are dissolved so it helps to Blitz the mixture once, then wait five minutes and blitz it again to make sure it is thoroughly dissolved and combined. 

When the Brownies are finished baking, remove from the oven and let cool for 15 minutes before removing them from the tray.

Once slightly cooled, remove from the tray and cut them. Place them on a plate and drizzle with the icing. The brownies should still be a little warm so the icing should melt over. 

Place in the fridge to go gooey and a little chewy. 

Serve your way - with whipped coconut cream is lovely!

fullsizeoutput_2a.jpeg


Cacao, Raspberry & Avocado Shake - Paleo, Keto

IMG_7457 2.JPG

The Ketogenic Diet has been getting some great attention from all over the world. And it is a lifestyle that I follow for six months of every year.    For 12 moths of the year, our household is paleo, for six months of that 12, I follow Paleo Keto. Doctors and Holistic medicine practitioners have started to see keto for its health benefits and especially, weight loss. In simple terms, a ketogenic diet switches the body from burning stored glycogen (carbs) for energy, to burning fat for energy. So once the body has burnt the fat that has been consumed, it is more easily able to switch over to burn the body fat as energy resulting in dramatic weight loss for most. If you wish to research more about the Ketogenic Diet, I recommend clicking HERE and reading about it through Dr Josh Axe. He is a wonderful resource.

When it comes to the Ketogenic Diet, there are two major forms. Low Carb High Fat (LCHF) or Low Carb High Protein (LCHP). The difference is exactly what the name implies. One diet favours fat, the other favours protein. Following both of these methods will get you into ketosis, the differing point (and most important point being) that following LCHP helps you maintain your lean muscle mass, which helps you to burn fat long term, as muscle burns fat. Goes without saying that if you have more muscle, you will burn more fat. Following a LCHF diet is great in the interim. It will switch your body over to burning fat, but almost all people that follow this form of Keto hit a weight loss stall. You can't expect to lose fat, if you are consuming enough to be burnt and haven't left yourself with a deficit for weightloss. One of the main reasons I don't like LCHF is because fat is very calorie dense, but very Nutrient Depleted. In my eyes, the goal isn't just weight loss, it is regaining health, which comes to those who follow a low carb high protein practice due to the nutrient density of protein rich foods.

For LCHP,  I highly recommend following Ketogains (they have a VERY knowledgeable group on facebook as well as a website) and reading the articles in their pinned post. There is a lot of valuable information sources there that are scientifically backed and blow the myth of 'too much protein won't put you into ketosis' right out of the water! What will put you into ketosis (metabolic state of burning fat) is limiting net carbs to under 25 grams per day. This has nothing to do with protein. You can get in touch with Ketogains HERE and start looking into the LCHP option... it's great just to familiarise yourself so you can make the most informed decision as to what suits you best. 

(***These are an affiliate link from businesses in our collective, which means we may earn a small commission if you buy something, but that’s ok because we only endorse products and businesses that meet our strict guidelines anyway… we just thought you should know xx)


SO on with the show! This morning I woke feeling the need for something refreshing and something new and exciting! Normally my Keto mornings are either fasting, or I go for the easy option which is to make an Egg Wrap ( Recipe coming soon! ), but this morning had me craving something very different.

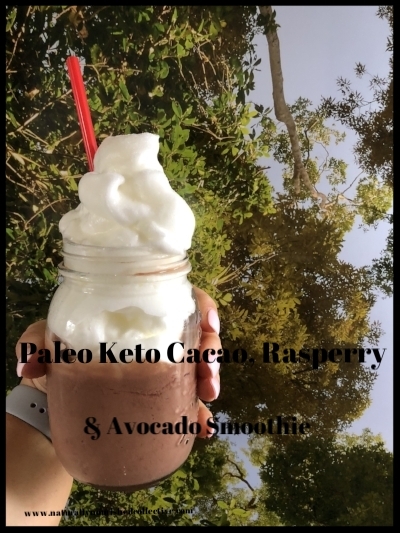
Looking at this picture, I assume you're thinking- pure decadence. I assume the because that's what I think when I look at it. So it will surprise you to know that this is super refreshing and not as thick and rich as it looks! The whole drink including the whipped egg white on top is c12, f15, p11. If you're new to keto, that means 12 grams of carbs, 15 grams of fat and 11 grams of protein. This is little high on the carb front when you think it only leaves you with 8 carbs for the rest of the day, but it's what helps this keto shake pack a punch nutrient wise. 

Using Cacao in this instead of cocoa, means yes, it's a little bit more bitter than some would like, but if you're used to cacao, you are going to Love it. The main reason for using Cacao instead of cocoa is the intense nutritional density that cacao holds. The 6 grams of cacao used in this shake holds a massive amount of magnesium making it super great for helping balance electrolytes when in ketosis along with aiding in the basic function of every cell in the body. You could also add some cocoa if you prefer the taste to help it balance out the bitter ness, and the benefit being that cocoa has potassium in it which also helps with electrolytes. Even though it isn't AS nutrient dense as cacao, it still has it's benefits.

I'm pretty sure we all know that raspberries are good for us, but do you know how good? "Raspberries are an excellent source of vitamin C, manganese and dietary fiber. They are a very good source of copper and a good source of vitamin Kpantothenic acidbiotinvitamin Emagnesiumfolateomega-3 fatty acids and potassium." This is why it isn't just a cacao smoothie! A serve of raspberries, holds an awesome 151 mg of potassium! That is absolutely awesome in general, however super awesome for when you are keto because you need to replenish electrolytes fiercely! Pairing the raspberries with avocado, means you are setting your brain up for a good functioning day! With all the healthy  fats in avocado, monosaturated fats (single chain fat, which is the best source of fat to consume when it comes to fat!) Saturated fat and polyunsaturated fat, and the omegas in raspberries, this is a nutrition powerhouse that should put your brain on the best track for the day and aid in focusing memory retention!

(***These are an affiliate link from businesses in our collective, which means we may earn a small commission if you buy something, but that’s ok because we only endorse products and businesses that meet our strict guidelines anyway… we just thought you should know xx)

The trickiest part of this whole recipe is the whipped egg whites. My god. I went through 8 eggs getting these bad boys to look like this! I'm certainly not suggesting you put that much effort into it, but I was determined. The whipped egg whites on top make up the protein portion of this meal, so it is super important to have. Would also be a good idea to mix the whipped egg white through the smoothie so it goes all light and fluffy like a mousse! Let me know if you give it a go! ( I actually just gave myself an idea for a new keto recipe! thanks brain!)

So since whipping egg whites is a bitch, I'm going to give you a couple of tips. 

1. Do not walk away from your egg whites while they're whipping! they can go from fluffy to over whipped EXTREMELY Quick!

2. Once you're whipping, don't stop production! The egg whites don't like it and they will deflate and separate.

3. Make sure every utensil, bowl, whisk and even your hands, are completely washed, clean and DRY! Eggs will not go fluffy if there is any dust or grease or water or ANYTHING near them that shouldn't be. They are super temperamental. 

4. Add your stabiliser (Sugar haha no! But you can use lemon juice of cream of tar tar - which by the way is potassium) at the foamy stage! NOT AT THE START! My god that batch was a disaster!

5. Start whipping the egg whites on low, and once you reach the foamy stage and have added your stabiliser, THEN turn it up to full speed until you reach firm peaks. 

6. Add Vanilla at the end and fold it through. If you really don't like not having a sweetness to the whipped whites, you can sprinkle with a little xylitol..... don't worry, I'll face the other way while you do it!

With those tips, I'm sure you'll do fine! lol well hopefully much better than I did! On a brighter note is I had a lot of left over egg yolks, So I made some Vegetable frittata for my kiddos which they loved! So that's a win!

Well, onward with the show now and I'll pop the super simple recipe below for you! As per usual, let me know what you think in the comments below! Happy Eating!

(***These are an affiliate link from businesses in our collective, which means we may earn a small commission if you buy something, but that’s ok because we only endorse products and businesses that meet our strict guidelines anyway… we just thought you should know xx)


Recipe

Serves - 1 - 

Time - 10 Minutes -  plus time to whip egg whites - 


What you need:

For the Smoothie:

100ml Almond Milk

25g Frozen Raspberries

25g Avocado ( Half a Small Avocado )

6g Loving Earth Raw Organic Cacao (1 Tablespoon)

50g Nudie Plain Coconut Yoghurt ( The Vanilla has monk Juice)

1 Cup Ice

For the Egg White Whip:

2 Egg Whites ( Room temp preferred )

Mixer of choice

Stabiliser (Cream of Tartar or Lemon Juice)

Vanilla Bean Pod


What to do:

In a High Powered Blender ( I Use a Nutri Ninja, similar to Nutri bullet) add all of the ingredients for the smoothie section of ingredients, and blend until smooth and creamy. Place into a Jar or Glass of choice and place in the Refrigerator while making your egg white whip. 

***Important Tip!!!!! Do not make the whip first as egg whites fall easily***

Make sure your bowl, spatula, whisk, even your hands are washed and dried thoroughly and no grease or dust remains anywhere! (Check out our whipping tips above)

Place your egg whites in the bowl for your stand mixer, and start whipping on a slow speed until foamy (big bubbles)

Once Foamy, add your stabiliser while the mixer is still running (I used lemon Juice, but cream of tartar works and also is made from potassium which balances electrolytes)

Turn up to full speed and mix until firm peaks and  the mixture becomes glossy. 

Take out from the mixer and add your vanilla and fold through. 

You can pipe or spoon into your Glass or jar and Voila!

fullsizeoutput_2a.jpeg


Apple 'Biscuits'

IMG_1589.JPG

I know what you're thinking ... "These have been done before" and I know they have been. But Seriously... with how healthy and delicious they are, I can't NOT add them to my collective!

The possibilities are endless when it comes to toppings you can put on these bad boys. And! If you have made them before no doubt you will know that spreading the butter of choice onto the apple or pear slice can actually be a bit difficult, especially if it's cold, so I thought I'd offer a couple of suggestions!

I have made these for every birthday that my little boy has had and they are always a hit with the kids! He is now three. And whats more exciting, is if you cut them into wedges instead of slices, you actually can make apple 'Nachos'. Pretty cool hey and amazingly great for kids parties!

I think the reason I love this recipe so much, or just these apple slices in general, is you can set everything out like a little assembly line, and then let the kids go to town. It's a really great idea to get them involved in the kitchen, and let them experiment with their individuality and creativity. What's more, is if you choose the right ingredients, you can get them to eat something really healthy. And they will eat it, because they made it. My little boy LOVES helping in the kitchen to make these 'biscuits'. He gets so excited with all the toppings he can choose! It does help to have a little bit of prep always done to make sure there's always something to sprinkle on top, but we usually have these things at the ready because we sprinkle similar things onto our paleo granola, and coconut yoghurt in the mornings!

Things like sugar free and dairy free chocolate chips work really well, but the ones in the pic above I made myself from my own Raw Chocolate Recipe. You can get the recipe HERE, and then you can either find a mould, or just simply put a little bit of the melted raw chocolate on a spoon, and make splatters onto parchment paper. They will be a little bit smaller than the drops in the picture above, as I use a mould, but will taste the same and rock your little one's socks just as much!

Sometimes when I have some sitting around, we also drizzle a little bit of our home made paleo Caramel Sauce over the top. If I do the caramel sauce, I usually omit the chocolate unless it's for an event like a party. The reason being is that you don't need that much sugar on any normal day. The apple already packs a sweet punch and depending on what you pop on the top, you really want to make sure you don't over do it. Just remember, just because they're natural sugars, they are still sugars and you can still have too much of them. If you would like the Caramel Recipe to drizzle over these bad boys (or to drizzle over wedges of apples to make 'nachos') click HERE.

When it comes to choosing the right apples to use, I have found pink ladies are the best! Especially if you are using somewhat bitter ingredients on the top! They're deliciously sweet and crispy. However, If you do have some sweeter toppings in mind, then I would suggest a good old Granny Smith apple because they are slightly more sour in comparison. Also, don't forget to choose Organic Apples if you can as the skin is eaten. 

The reason why it is important to consume fibre with any type of sugar, is because consuming fibre and fructose slow the spike in blood sugar. This is why I like to puree dates and use the puree to sweeten a lot of things. The naturally occurring sugar in dates is wonderfully flavourful, while the remaining fibre helps to regulate blood sugar. Prunes are also wonderful for this because of their high fibre content.. however sometimes the flavour of prunes gets me like *vom*. The flavour really doesn't match every thing, so use them with caution if you are trying to use them as a natural sweetener. 

Because this recipe isn't heated at all, I really love adding a sprinkle of pro biotic powder over the top of my little 'biscuits'. It's a great nutritional kick, and if you use cacao in your toppings then the pro biotics are being consumed with a pre biotic which is great to feed the bacteria and will be an awesome addition to your gut bacteria! So why not hey?!

As per usual, leave me some feedback if you give it a go! xx Much Love!


Recipe

Time - 15 Minutes - 

Serves - 2 - 

IMG_1546.JPG

What you need:

1 Pink Lady Apple Room Temperature

Peanut/Cashew/Nut Butter of Choice

Toppings of choice... I used:

Raw Chocolate Drops ( See recipe link in article above )

Cut Dried Apricot

Himalayan Salt

Pro Biotic Powder


What to do:

Get a Mug or cup of Hot Water and a butter knife. Place the knife in the Hot water to warm the knife blade. 

With a sharp knife, or a Mandolin, Slice your apple to your desired thickness. I recommend about a half a centimetre thick. Don't core the apple as the core has wonderful fibre and nutrients in it. Instead just push the seeds out. 

Open your Nut Butter of choice, and using the warm knife spread the butter over the apple slice. If the Butter starts to solidify and pull away from the apple, warm the knife again. 

Add your toppings of choice. Not too many, just enough to make it look pretty. 

Sprinkle Himalayan Salt (it tends to balance the sweetness out) and then sprinkle pro-biotic powder over the top. 

YUM!


fullsizeoutput_2a.jpeg