Recipe Book

My very own recipe compilation of Anti inflammatory and healing foods and meals. Nutrient dense meals ready to rock your mind, body and kitchen. With some helpful info along the way...

Search by the tags for a quick list of meals that suit your lifestyle.

Chocolate & Peanut Butter Slice - Raw, Vegan, GF, DF, Refined Sugar Free, Paleo Option

***This post contains affiliate links which means we may earn a small commission at no extra cost to you if you make a purchase, but thats ok, because we only advertise businesses from our collective that meet our strict health guidelines...and it's…

***This post contains affiliate links which means we may earn a small commission at no extra cost to you if you make a purchase, but thats ok, because we only advertise businesses from our collective that meet our strict health guidelines...and it's what keeps our page up and running***

Dearly beloved, we are gathered here today to join this man (Chocolate) and this woman (Peanut Butter) in holy matrimony. 

Chocolate, do you take this nutty, smooth woman to be your wife, to live on top of her, to love her for her bold taste and ability to cause anaphylaxis, to honour her ability to be both sweet AND savoury, to comfort her when she's upset that he nearly killed a bunch of people, and to keep her in line to remain square, forsaking all others, until someone eats you? - 'I do'.

Peanut Butter, do you take this tall, dark, rich, smooth man to be your husband, to live together, underneath his thick gooey layer, to love his boldness to honor his status amongst chocolate lovers, to comfort him about his weight and ability to melt in the hot sun, and to keep him in deliciousness and in taste, forsaking all others, until someone eats you? - 'I do'

I feel like you're either laughing... or assuming I've just gone full retard here. But what can I say? The Royal Wedding has got me reminiscing of my own wedding, and made me so happy to see love being celebrated on the news and surroundings. Isn't it such a nice change of pace from all the war and hate that we see constantly broadcasted these days!? What a beautiful thing to be able to witness and see in our lifetimes - although I have to admit that it made me sad that Harry is now off the market. The only time I stood a chance with Harry, is if he tried my cooking haha. 

So anywayyyyy. You'll seriously want to get on board these bad boys! They are so good AAAAANNNNNDDDD if you're after a more protein filled source, you can sub the coconut flour for your protein powder to give them a bit of a nutritional boost. But, given this isn't a keto recipe and contains Agave Nectar (which is still a sugar) I prefer to keep the calories down. 

The good thing about this recipe is if Peanut Butter agrees with you, then you can use it, but if you prefer a paleo approach (We are a Paleo Household however every now and then I indulge in Peanut Butter) you can sub for any nut butter you like. I think these would be AMAZING if made with Hazelnut Butter! Who doesn't love Hazelnut and Chocolate? Yeah thats right, NO ONE and im pretty sure it's fair to say that if you know someone that doesn't like hazelnut and chocolate, that you need to remove them from your life IMMEDIATELY! 

Now obviously it's up to you to source some good vegan chocolate, and you are most welcome to use a brand that you personally love! I love Loving Earth's Dark Chocolate, so that's what I made these out of. But if there's something else you prefer, by all means, use that. I have tried to make something similar with Pana Chocolate Blocks, however it just didn't work. The Pana split and went all funky. To keep this recipe raw, and given that the lovely folks at Loving Earth put in a lot of effort to make such a delicious raw product, I think it's only fair that we don't ruin that hard work by over heating this delicious product and ruining what they have tried so hard to preserve. Heating foods internal temperature above 41.7 degrees Celsius starts to ruin the health benefits of many of the foods we consume. So where ever you can, it is beneficial for health to consume as many raw products as possible. Heat destroys foods nutrients and natural enzymes, which is bad because enzymes boost digestion and fight chronic disease so where you can, give your oven and stove a rest, and eat raw foods. 

So that being said, melting this chocolate and keeping it in it's raw state is a little fiddly. But you can do it! So follow the recipe as close you can and keep a thermometer at hand. 

So on with the show. As per usual, leave me a message if you make this and let me know what you think. I'd love your thoughts. 

Don't forget to - Make, Enjoy, Love & Share. xxx


Recipe

Serves - 10 - 

Time - 45 Minutes to make, Plus Chill Time - 


What you need:

For the Base:

High Speed Food Processor

Square Dish & Baking Paper

Spatula

1 Cup Natural Peanut Butter or Nut Butter of Choice ( I made my own, but Mayver's is a great brand )

1/4 Cup Dark Agave Nectar ( You can Sub for Maple )

1/2 Cup Coconut Flour

Pinch Of Salt

1/2 Vanilla Pod ( Optional, but I highly Recommend! )


For the Chocolate:

Food Thermometer

Bowl & Saucepan ( or Double Boiler )

1.5 Cups Loving Earth Raw Dark Chocolate Squares

1/4 Cup Peanut Butter or Nut Butter of Choice

1/4 Cup Tahini

Pinch of Salt


What to do:

Line your baking dish with your baking paper first, and set it to the side so you are ready to rock. 

Make the Base first - so in the food processor place in all the ingredients for the base except the agave syrup. Turn the processor on. The Mixture should start dry, and add the syrup slowly until it resembles a thicker form of cake batter. It should be spreadable, but not loose. If your mixture becomes loose before you use up all your agave, then thats great! Stop there. 

Using the Spatula, spread it into your baking dish so that it is one even layer and place in the fridge to cool.

Now we need to make our Chocolate Layer.

Make sure your chocolate is Room Temperature before starting to limit the heat you need to melt it. Place water in the saucepan, and place onto the stove on a LOW HEAT. Place your bowl on the top and drop your chocolate in. Use the thermometer, and constantly stir to melt the chocolate. If you notice the heat of the melted chocolate getting to around 35 degrees C, Take the bowl off the top of the saucepan and stir vigorously to get the heat back down, then when the heat is down, place back on the saucepan. Once 3/4 of the chocolate is melted, turn the heat off and the residual heat will melt the rest.

Once melted, add the Peanut Butter, Tahini and Salt and mix until well combined.

Pull out the dish from the fridge and pour the chocolate over and spread with the spatula until evenly covered. 

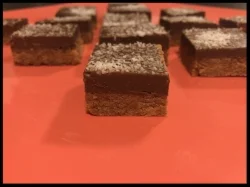
You can dress the top however you like. I just sprinkled some Loving Earth Desiccated Coconut over the top. But let your imagination run wild with how you want to do it. 

Place it back in the fridge (NOT THE FREEZER as this can cause the choc to turn white) until set through. 

Once Cooled, take out of the baking dish, and slice the uneven edges off (and enjoy them in hiding before you serve the rest to everyone else ;) ) and then slice into Bars, or Squares or whatever you fancy. 

Enjoy!!!

fullsizeoutput_10d3.jpeg
8RsVTjrpRjuXkU46XcHkIA.jpg


Apple 'Biscuits'

IMG_1589.JPG

I know what you're thinking ... "These have been done before" and I know they have been. But Seriously... with how healthy and delicious they are, I can't NOT add them to my collective!

The possibilities are endless when it comes to toppings you can put on these bad boys. And! If you have made them before no doubt you will know that spreading the butter of choice onto the apple or pear slice can actually be a bit difficult, especially if it's cold, so I thought I'd offer a couple of suggestions!

I have made these for every birthday that my little boy has had and they are always a hit with the kids! He is now three. And whats more exciting, is if you cut them into wedges instead of slices, you actually can make apple 'Nachos'. Pretty cool hey and amazingly great for kids parties!

I think the reason I love this recipe so much, or just these apple slices in general, is you can set everything out like a little assembly line, and then let the kids go to town. It's a really great idea to get them involved in the kitchen, and let them experiment with their individuality and creativity. What's more, is if you choose the right ingredients, you can get them to eat something really healthy. And they will eat it, because they made it. My little boy LOVES helping in the kitchen to make these 'biscuits'. He gets so excited with all the toppings he can choose! It does help to have a little bit of prep always done to make sure there's always something to sprinkle on top, but we usually have these things at the ready because we sprinkle similar things onto our paleo granola, and coconut yoghurt in the mornings!

Things like sugar free and dairy free chocolate chips work really well, but the ones in the pic above I made myself from my own Raw Chocolate Recipe. You can get the recipe HERE, and then you can either find a mould, or just simply put a little bit of the melted raw chocolate on a spoon, and make splatters onto parchment paper. They will be a little bit smaller than the drops in the picture above, as I use a mould, but will taste the same and rock your little one's socks just as much!

Sometimes when I have some sitting around, we also drizzle a little bit of our home made paleo Caramel Sauce over the top. If I do the caramel sauce, I usually omit the chocolate unless it's for an event like a party. The reason being is that you don't need that much sugar on any normal day. The apple already packs a sweet punch and depending on what you pop on the top, you really want to make sure you don't over do it. Just remember, just because they're natural sugars, they are still sugars and you can still have too much of them. If you would like the Caramel Recipe to drizzle over these bad boys (or to drizzle over wedges of apples to make 'nachos') click HERE.

When it comes to choosing the right apples to use, I have found pink ladies are the best! Especially if you are using somewhat bitter ingredients on the top! They're deliciously sweet and crispy. However, If you do have some sweeter toppings in mind, then I would suggest a good old Granny Smith apple because they are slightly more sour in comparison. Also, don't forget to choose Organic Apples if you can as the skin is eaten. 

The reason why it is important to consume fibre with any type of sugar, is because consuming fibre and fructose slow the spike in blood sugar. This is why I like to puree dates and use the puree to sweeten a lot of things. The naturally occurring sugar in dates is wonderfully flavourful, while the remaining fibre helps to regulate blood sugar. Prunes are also wonderful for this because of their high fibre content.. however sometimes the flavour of prunes gets me like *vom*. The flavour really doesn't match every thing, so use them with caution if you are trying to use them as a natural sweetener. 

Because this recipe isn't heated at all, I really love adding a sprinkle of pro biotic powder over the top of my little 'biscuits'. It's a great nutritional kick, and if you use cacao in your toppings then the pro biotics are being consumed with a pre biotic which is great to feed the bacteria and will be an awesome addition to your gut bacteria! So why not hey?!

As per usual, leave me some feedback if you give it a go! xx Much Love!


Recipe

Time - 15 Minutes - 

Serves - 2 - 

IMG_1546.JPG

What you need:

1 Pink Lady Apple Room Temperature

Peanut/Cashew/Nut Butter of Choice

Toppings of choice... I used:

Raw Chocolate Drops ( See recipe link in article above )

Cut Dried Apricot

Himalayan Salt

Pro Biotic Powder


What to do:

Get a Mug or cup of Hot Water and a butter knife. Place the knife in the Hot water to warm the knife blade. 

With a sharp knife, or a Mandolin, Slice your apple to your desired thickness. I recommend about a half a centimetre thick. Don't core the apple as the core has wonderful fibre and nutrients in it. Instead just push the seeds out. 

Open your Nut Butter of choice, and using the warm knife spread the butter over the apple slice. If the Butter starts to solidify and pull away from the apple, warm the knife again. 

Add your toppings of choice. Not too many, just enough to make it look pretty. 

Sprinkle Himalayan Salt (it tends to balance the sweetness out) and then sprinkle pro-biotic powder over the top. 

YUM!


fullsizeoutput_2a.jpeg


Baby Rice Bites

IP6FYgRtRQaMEwYH0Klt0A.jpg

As parents, we are always trying to find nutritious recipes for our children... and with a lot of us battling the clock daily, it can be really hard and exhausting (not to mention a heinously time consuming task) to pre make foods and freeze them. 

Let's be honest... make ahead meals are a STEALLAR idea! They really are. But with our lives being so full on these days, the only time we really have to un wind is in the evening - if you're kids go to bed early enough and before you pass out after a massive day - or the weekend - and then it's family time and you're stuck between time with the family, washing, dishes, cleaning to get ready for the week ahead. So really... having to sacrifice MORE of your relaxing time or special one on one time with your Luvahh to get everything ready and prepped for the week ahead... to me is just unfair. 

So I thought I'd share what I do to help myself get ahead for the week, but also keep on top of the diets for all in the family by making nutritious meals without sacrificing as much time as I would have too if I did week ahead prep with freezable meals. 

Each to their own, but this is what I do and it works. 

SO! Whenever I'm cooking a meal, I always make a little extra when what I am making is foods that can be re heated and re served... like pasta sauce, mashed sweet potato, etc. This isn't limited to just dinner. I also do it for what ever we have for breakfast and lunch! But what if I'm not making meals that can be re heated? Or something spicy that my babies aren't ready to try yet? Then I simply make other things, when I have a lull in what I'm cooking. For example, If I am cooking Roast chicken and vegetables, I peel and grate extra vegetables to make baby food, and put a pot of water on so it's there if I need it. Sometimes I'll make some rice, or GF Quinoa Pasta, or Quinoa, even chick peas and lentils. All of these things are great because you can put them on to cook and not have to tend to them much and you can always leave the grated vegetables raw (my fave), or if you chop them then throw them in the pot as well with what ever grain or legume you are cooking. The brilliance in doing this is, if you don't need the water in the end, you can just empty the pot, run a tea towel around it and put it back in the drawers. I do this while the chicken is cooking and I'm waiting to put the vegetables in the oven.  I like doing it this way because this is time I wouldn't be sitting and relaxing anyway because I'd be cooking dinner, so it makes sense to me to just re arrange the things I'm doing and be more constructive with the time I am actually in the kitchen. 

When I made these little Rice bites, I was cooking a vegetable frittata. It already had carrot and zucchini in it, so I grated extra for these bites and left them to the side. When the Frittata went into the oven, I then measured and got the rice ready. While the rice was cooking, I organised my storage for the rice bites, and when the rice was ready, I added the vegetables and placed the lid back on to cool while we ate. Then the frittata was ready. I pulled the frittata out of the oven to cool on the bench until able to the handled and tidied up while cooling. Served Dinner, once everyone had finished eating, the rice and vegetable mix was cool enough to be handled and I rolled into the balls and stored them away. 

It's all about utilising the time you DO have and doing the most you can in that time! I realise this method isn't for everyone, but it certainly works for me! I am a busy mum of 3 under 3, I run my own business from home and am studying - so at the end of the day I want to sit down with my tea, and relax. Not run around the house and go to bed all stressed wondering if I've done everything. This is why I've found this method extremely helpful.

Anyhow! On with the rest!

In our house, I follow a STRICT Paleo lifestyle for myself. I have so many health concerns that are upset by grains, processed foods, additives, sugar, dairy and am coeliac so no gluten here ( and there wouldn't be even if we weren't a coeliac household - shits nasty )... so we generally don't have things like rice laying around. For our three year old son and hubby, they follow the same eating practices that I do. However since having the twins, I have just wanted to introduce things like Rice, Teff, Chickpeas, Lentils etc to them, so there are no adverse reactions in future. They don't eat this stuff all the time, but in my personal opinion, I feel it is important to introduce a wide range of foods to babies as young as you can. So I always keep a pack of chick peas, Organic Arborio Rice, and Quinoa etc on board just so they have a little variety every now and then. 

If you are going to feed your bubs rice, I ask this with sincere PLEADING! PLEASE PLEASE PLEASEEEEEE only give them organic rice. Rice crops are sprayed with arsenic to rid rats from the crops... which means, you guessed it, arsenic remains on the rice when you feed it to your family. This includes all rice snacks, normal rice, rice cakes, biscuits, you name it. Please only ever choose Certified Organic and make sure it has the logo that ensures the product is properly certified organic and not just trademarked. ( Yes, companies can pay for a trademark for Organic which means the product doesn't actually have to be organic ). Apart from the rice being organic, please make sure when you feed your little ones that you give them organic produce where possible. This is important because we want them to be eating the skin on vegetables and fruits to make sure they are getting great amounts of fibre and pre biotics for their little digestions. I understand not everyone can afford to do this... and you know what - if you don't do it at all that's totally fine. But here's a simple suggestion if you can't afford a completely organic produce shop but want to do the best by your fam - If you eat the skin, buy organic, if you throw the skin away you can choose normal veg and fruit. This way you are getting the best of both worlds, price and health.

This recipe is so simple you'll love me for it. And it makes about 6 - 7 serves of Rice bites so you can freeze them and pull them out in the morning to defrost in the fridge as you need them. When making these, you need to use a sticky rice like Arborio. I like to keep food for the babies as simple as possible (actually, even for us all) as our digestion can only handle so much at a time. The less ingredients something has, the easier it is for the body to break down and absorb the nutrients. This is why I like using a sticky rice, so I don't have to add a binding agent like Egg or Chia seeds...it also limits the amount of time in the kitchen and your dishes while eliminating needing to do a second lot of cooking to cook through the egg if that's what you use to bind the mixture together. So sticky rice = less fuss, less mess and lessssss stress!

When adding the vegetables to the pot, since the veggies for this are grated, I prefer them to be raw. It ensures maximum nutrients and enzymes remain in the food, so I only ever add the vegetables to the pot once the rice has already absorbed all the water and the heat is turned off. Of course you can add them earlier if you like, it's totally up to you. I just prefer maximum nutrients through less heat administration. 

Well! Since I've told you all my tips and tricks, I best get on with the recipe!

As usual, if you give it a go, let me know in the comments and share far and wide to make sure we are showing mums and dads all over how easy it can be to make something nutritious for our little loves!


Recipe

ye8zdDcIRde98jHgY8rEIg.jpg

Serves - 6-7 depending on size rolled.

Time - 20 Minutes plus Cooling and Rolling Time - 

Age - 8 months +


What you need:

1 Cup Organic Arborio Rice

Water amount as per the absorption method instructions for the rice on the packet ( handy hint - use bone or vegetable broth instead of water for added nutrition)

1 Whole Grated Organic Carrot

1 Whole Grated Organic Zucchini (including stem on the top)


What to do:

Cook your rice as per the absorption method on the back of the packet of rice you are using with the water or broth.

Grate your Carrot and Zucchini and give a little squeeze to get rid of some of the water. It doesn't have to be extremely dry, just to rid the excess. 

Once the Rice has absorbed the water (or broth) add the grated veg and mix thoroughly. 

Let sit until cool enough to handle. 

Once you are able to handle the mixture, roll into balls. The size will be up to your discression based on how old you little one(s) is/are.

Serve Warm, or place in container and refrigerate. You can also freeze them and then pull them out in the morning the day you need them. 

I find my twins enjoy about 4 each per serve (if they aren't having anything else with the meal)

Voila! Enjoy!


fullsizeoutput_2a.jpeg

Banana Cream Pie - Raw, Vegan, Paleo

IMG_1062.JPG

Well while todays kitchen made something sweet, it comes with a heavy heart... haha that makes this recipe sound so much sadder than it should.

Today I baked myself a cake... a cake for my birthday. Ok, not really a cake, a pie really. But still, I made it for myself because *sigh* I turn 30 tomorrow. I know those of you that are older than me will say "that's still young" or "I loved my 30's" and I get that... but don't forget you probably also felt a little odd finally hitting your 30's as well. I just really don't understand how time flies so quickly! It really feels like in a flash the last 10 years have darted past me and I've just been standing here watching it happen. I have achieved SO much in the last 6 years alone though and I have SO much to be grateful for... I guess it just feels like the end of an era. Tomorrow I will wake up and no longer be in the bracket 18-29.... I will be in the next bracket when I tick boxes on forms - 30-40. And that, my friends, feels like a shock!

So! As I usually do when I get a little sad, I take to the kitchen and remind myself, that even when I'm old... I'm a bloody amazing cook *insert cheeky face here*. But seriously... every time I'm feeling down... the kitchen has an amazing way of bringing me back down to earth and re energising me. There's something really beautiful and calming about cooking and baking. Taking chances on new recipes, trying other peoples amazing recipes, just throwing caution to the wind and whacking anything together and seeing what happens. While the risk may be small, it still makes the day that bit more exciting to see how or if something will work out and when it does, watching my amazing family enjoy the food I make, really makes my heart and soul warm, fuzzy and happy. 

It goes without saying that If I have to turn 30, then I'm eating cake... and I will eat as much cake as I like... cake for breakfast, cake for morning tea, lunch, in the bath, with wine, after dinner, in bed... you name it, tomorrow there will be cake in, on and around me. 

While I sat here this morning (wallowing in self pity of turning 30) and staring at the quickly ripening banana's on the kitchen table and thinking "I really got over excited with the amount of fruit I bought this fortnight", I also found myself slowly gathering random ingredients and grabbed the bananas. Truth be told, when I started making this, I was going to make a pudding... but when I have a bit of pent up frustration ( get your mind out of the gutter ) , I find that I need something to chew on, and that's when I decided to turn it into a pie and add a base. 

You could pop the base into the oven to crisp it up a little bit. That would actually be delicious. But I decided since there is a large likelihood of me eating a whole cake on my own tomorrow, that I had better keep as many nutrients in tact as possible so I'm not just eating empty calories. If you do decide to pop the base into the oven for the little bit, please let me know how it goes. I reckon it would taste amazing!

If you are a frequenter of this website, and have tried the Citrus 'Cheese'cake, you will notice that some of the ingredients here over lap with that recipe. I find that most raw cakes are usually made of the same base so it's not really a shock. Providing you have the flavour in mind that you want to use, you can pretty much adapt the cheese cake recipe to make anything you like and use the coconut oil as a lever as to how firm or soft you want the final product to be. Most of the difference in this pie versus the 'cheese' cake is the way it's presented, and that this has less coconut oil to make it not set as solid...also the fact that I have never had a banana cheese cake and I'm not too sure that it would taste particularly good!

Most of the ingredients for this recipe you will find in your pantry which is really handy! And those that aren't already in your pantry won't be hard to find at all. I do like to add Collagen and Pro Biotics to any of my recipes that are raw and remain in the fridge. As I have said before, I am a big believer in Food as Medicine and therefore like to add an extra nutritional boost wherever I can. If you are strictly Vegan, you can sub the collagen/gelatine for Agar Agar for a similar nutritional boost. I know that powdered pro biotic powder and collagen can be harder to come by, so you can purchase the powder I use HERE and you can purchase the Great Lakes Gelatin/Collagen supplement I use HERE. Of Course If you really don't want to add these products you don't have too. They make no difference in the structure of the pie, they are strictly there for nutritional value. 

While I was making this I was thinking that it would actually work to add a bit of turmeric as well...this of course will brighten the colour of the pie instead of it being the off - white colour that it is and also will pack a nutritional punch... but I decided against. The next time I make it I will add it and see how it goes. 

On the top of my pie in the picture you will see there is Raw Chocolate and Caramel. Those recipes are all my own recipes. You can access the Raw Chocolate recipe HERE and the Salted Caramel Recipe HERE. There is something about Bananas and caramel that just works, and adding the little bit of raw dark chocolate was great because having banana and caramel can be a little too sweet depending on your palate. You of course don't have to add anything to the top. It looks beautiful the way it is, but I was feeling fancy and for once I had some time up my sleeve to make it a little bit extra special!

So I've crapped on enough now, the recipe is below and as per usual... if you make it, chuck a comment below and shareeeee far and wide so others can enjoy some healthy deliciousness in their lives!


Recipe

Serves - 8 - 

Time - 45 Minutes - Plus setting time


What you Need:

Pyrex Pie Dish ( or any pie dish )

Crust:

220g Roasted Mixed Nuts ( or nuts of choice ) 

2 Tablespoons Raw Organic Maple Syrup

1 Tablespoon Melted Coconut Oil

1/2 Cup Fine Desiccated Coconut

2 Tablespoon Flaxseed

1/2 Teaspoon Cinnamon


Filling:

220g Raw Organic Cashews ( Soaked Over Night, or for non Raw Version, in boiling water for 1 hour )

Can of Coconut Cream ( In Fridge Over Night and drain Water, use solids that remains )

1 Over ripe Banana

1 Teaspoon Nutmeg

1 Teaspoon Cinnamon

2 Tablespoons Raw Organic Maple Syrup

1 Cup Melted Coconut Oil

Pinch of Salt

If adding - 2 Tablespoons Collagen or Agar Agar, 1 Teaspoon Pro Biotic Powder


What to do:


Crust:

In a Food processor ( I use the processor attachment on a Nutri ninja ) add all of the ingredients for the crust and process until combined. The Maple needs to be evenly combined amongst it all so it goes firm in the fridge. Don't pulverise until it goes liquid. You want there to still be some chunks to the nuts. Think Crushed nuts on the top of a sundae... that's the type of texture you want. 

Once everything is processed, push firmly into the bottom of your pie dish. I use a pyrex pie dish for mine. There is no need to pre grease the tray. Because this isn't baked it won't stick to the bottom. 

Place the base into the freezer while you prepare the filling. 

IMG_5671.JPG


Filling:

Soak your cashews over night ( for a raw version ) but if you aren't phased on if it is raw or not, you can fasten this process up by covering your cashews in boiling water and covering with a lid for an hour. 

Once your cashews are soaked, place in your high powered food processor with all the other ingredients and blend until smooth and airy. Now I was doing this in the food processor attachment of my Nutri ninja, but I noticed it was somewhat grainy in texture. So I transferred the contents to the Cup Blender ( Similar to the Nutri Bullet ) as it processes things much more fine. This is what gives the creamy texture instead of grainy. You can't do it in the cup processor first as it isn't big enough and your ingredients won't be evenly combined. It is well worth the extra dishes if its grainy, to transfer after the food processor to the cup processor like the Nutri Bullet and blend until no lumps remain. 

Pull the base from the freezer and pour in your filling. 

If you are going to decorate with the Raw Chocolate, place the pie into the fridge and let a skin develop on the top of the pie before you drizzle the chocolate over the top. This stops the chocolate from 'seeping' and making the pie top look messy. Then place a dollop of you Salted Caramel Sauce on top.


Place in the fridge for four hours or until set. You can also freeze the pie to make ahead and pull out and place in the fridge to thaw over night!

IMG_0379.JPG
fullsizeoutput_2a.jpeg


Dark Chocolate - Raw, Vegan, Paleo, Refined Sugar Free

IMG_7085.JPG

Hey guyssssss. 

I am SO excited today. Seriously. SO Excited! I have not only managed to make a delicious Dark Chocolate...it actually tastes like dark chocolate! 

So many times I have tried to make Raw chocolate and it's always with coconut oil... and I'm not gunna lie... the taste after a while... phwoar. Well, needless to say you can get sick of it pretty quickly. 

I am in love with two brands of chocolate in this world. They are Pana Chocolate and Loving Earth. And this recipe I kid you not, is close to my favourite Dark Loving Earth Chocolate. Ok, clearly theirs has more depth of flavour, but this, I tell you, is close. Absolutely delicious and how perfect is this for Christmas! I got this amazingly cute little mould from Kmart about 3 years ago and I love it. They really have some great things if you get there at the right time. This mould cost $2 and it's silicone so you can freeze AND bake in it! I know right... your mind right now is like KABOOM!!!!!

Anyway... 

When you make this recipe, it's really important to maintain the nutritional value of the honey or maple syrup and cacao. When foods get too hot their nutrient content depletes dramatically. Especially when it comes to Raw Organic honey and Raw Organic Maple...you're spending the money to buy good honey and maple..so don't ruin it by over heating it. If you do that, you get absolutely none of the health benefits, and are just ingesting sugar. So I recommend adding the sweetener of your choice at the very last moment to make sure the mixture is as cool as humanly possible. It can be a little tricky because it also has to be warm enough that the honey or maple will somewhat melt and distribute evenly amongst the mixture. But providing you don't heat the cacao butter more than 46 degrees in the first place, you don't have to worry about this step. 

IMG_0476.PNG

So! Things that will be helpful in making this are - Moulds and a Thermometer. A Mould is great if you want to make little chocolates like I have above. These are great because you can wrap them in little cute gift bags for presents, or to hang off your Christmas tree. However, if you don't have a mould, fear not, because you can just line a baking sheet with baking paper and pour the mixture on. You could then chop up some nuts, perhaps add some beautiful dried fruits and sprinkle on top (try grated orange zest!) and then when it's set, break it up into bark chunks. This actually looks super cute as a Chrissy gift as well if you pop the pieces of bark into little cellophane bags and tie with a ribbon. The Thermometer is going to be your friend for making sure you don't heat over 46 degrees, HOWEVER, if you are willing to compromise SLIGHTLY the nutrient value of the cacao butter, you can just place it into a sauce pan, and leave over a light heat until half of the butter is melted. Take away from the heat and then stir until the remaining pieces are melted. 

For this recipe I prefer to use the Loving Earth Cacao Butter. The reason for this is it is grated and that means all different sizes. Because some are granule sizes, it doesn't take long to heat at all.

As you can see from the picture, a lot of it is really small so it takes minimal heat to melt which means chances are you won't go over 46 degrees Celsius.  But if you want to be extra careful, get a thermometer involved :)

So with Christmas coming at us full steam ahead, I'm making sure this year (like I do every year) that I eat sweets in moderation. And while my whole family doesn't follow my eating principles, I will be making some of these beauties to take with me to my parents to at least have a semi-healthy option. 

I seem to add this into every sweet recipe that I do, and today will be no exception. So I stress, Just because there is unrefined sugar in this, it doesn't mean it's a free for all to eat as much of it in one sitting as humanly possible. Honey and Maple while having so many health benefits, is still a form of sugar and will give you the same effects as refined sugar if you eat too much. So go easy. Be mindful when you eat and savour the food and experience it. Doing this makes it likely to stop you from over indulging. 

So Enjoy - and if you try the recipe, always to be sure to comment below and let me know how you went!


Recipe

Serves - 12 - (1 Piece per serve)

Time - 10 Minutes - 


What you need:

125 grams Organic Raw Cacao Butter

5 Tablespoons Raw Organic Cacao Powder 

2 Tablespoons Raw Organic Honey or Maple

1/2 Vanilla Bean

1/2 Teaspoon Cinnamon

1/2 Teaspoon Nutmeg


What to do:

In a saucepan, melt your cacao butter to no higher than 46 Degrees Celsius to melt and then remove from heat ( If you don't have a thermometer, place over heat until half the butter is melted, turn off heat and stir to melt the rest)

Once off the heat, add the cacao powder, cinnamon and nutmeg. Stir until combined. 

Add the Vanilla bean and Honey/Maple and stir until the sweeter of choice has dissolved. 

Pour into your silicone mould (no need to grease it) or pour onto your parchment paper. Place in the fridge if it is a hot day (you may notice the top of the chocolate turn white as the butter will solidify before the rest, this is normal and still fine to eat) or if it is a cool day or your kitchen is cool, leave on a table to solidify. 

Once the Chocolate has turned hard, place in the fridge for 30 minutes before handling for wrapping etc. 

IMG_2541.JPG


Voila !

fullsizeoutput_2a.jpeg