Recipe Book

My very own recipe compilation of Anti inflammatory and healing foods and meals. Nutrient dense meals ready to rock your mind, body and kitchen. With some helpful info along the way...

Search by the tags for a quick list of meals that suit your lifestyle.

Healthy 10 Minute Pasta - For Kids!

IMG_7167.JPG

I think every parent has those days where you really CBF cooking... to the point that you're not even phased if you don't eat yourself. But then you remember that you have little humans that rely on you, and you can't just Not Adult... so you get your bum off the couch and make something simple. Maybe Toast. Maybe Eggs. Maybe even a bowl of cereal...perhaps you even opt for the greasiest and just do a take away night! After all... kids don't really mind do they? But for the rest of the night you feel a little bit guilty inside that you haven't fed them something as nutritious as what you probably could have. 

Well I don't know about you, but I felt like this  A LOT when I was pregnant with the twins and I still had to feed my 2 year old... and I'd been working all day. Because we follow an anti inflammatory lifestyle here, and we have many intolerances/don't keep junk food in the house and I refuse to give my family nasty cheap food - our take away is usually grill'd burgers. And believe me when I say - Holy shit that gets expensive! $50 minimum on takeaway to feed three of us... and because I could barely walk from being pregnant with twins, sadly this happened around 2-3 times a week. Bye Bye Money. I was like Beyonce throwing money at Maids... but I was throwing money at the waiters at Grill'd and making them feed me. 

So if you're a mum... a dad... a grand parent.. or a special person... and just want to SIT DOWN... may I suggest that you try this 10 minute pasta! Truth is, it only takes 10 minutes because that's how long the pasta takes to cook. The sauce itself is literally done in 5 minutes! You don't even have to chop anything. All you need is a blender or food processor... and a saucepan for the pasta of choice. 

We use Orgran Gluten Free Pasta for our son, Seth. It's made from Rice and Corn (I know not anti inflammatory however it does the job as a once off every now and then) and it comes in fun shapes! The pic above is their 'Out Back' animals pasta and Seth loves going through and looking at the Koala's and Kangaroos. So it's super fun for the tots! Not to mention, they also include spinach and other veggies in the pasta to make it fun colours. The sauce is also considered raw which is great because it means the nutrients in the vegetables are still intact and therefore packs a great nutritional punch. 

We don't eat dairy in this house, and the substitute I LOVE when it comes to cheese on pasta is Nutritional Yeast! It has the most wonderfully cheesy flavour but is packed with Protein and B Vitamins! I highly recommend it. Little mate thinks it's cheese ( the poor love haha) so he always asks for it on his meals. It really does contain great nutritional value and it's quite well priced! I usually use the Bragg's Nutritional Yeast, however Wholefood Merchants were out of Bragg's this fortnight so I am trying the Lotus brand... tastes the same and was a bit cheaper which is a win!

So here you go. Some relief for parents EVERYWHERE! It doesn't look the prettiest.. but hey it's gunna come out looking much worse... amirite?

As usual, let me know how you go if you give it a try and let me know what your little ones think! It really packs a punch of flavour and hey - why not even mix it through some Quinoa pasta for an easy meal for yourself?


Recipe

Serves - 2 - 

Time 10 Minutes

What you need:

Blender/NutriBullet/Food processor 

1 Organic Tomato

1 Clove Garlic

1 Handful Spinach Leaves

1 Teaspoon Tomato Paste

1/6 of an Onion (literally just a couple of Rings)

1/2 Teaspoon Italian Herbs (Oregano or Basil will work too)

1 Tablespoon Olive Oil

Nutritional Yeast

Salt & Pepper

1 Cup Animal Pasta (=2 Serves for small People)


What to do:

Put a saucepan of Water on and cook Pasta as per your Pasta packet instructions.      

While the water is boiling, in your blender add your Tomato, Spinach, Garlic, Onion, Herbs, Tomato Paste and tablespoon of Olive Oil and a pinch of Salt & Pepper. Blend until all combined. 

Once the pasta is cooked, scoop 1/2 cup of the Pasta water out and keep it in a cup to the side and then drain the Pasta.

Once the Pasta is drained, add it back to the Pot and pour the Sauce from the blender over the pasta. Mix well and then add the half a cup of pasta water. This will thin the sauce out and ensure it evenly covers the pasta. 

Serve into the bowls and top with Nutritional Yeast and Voila! 


I told you it was simple, didn't I? xx   

fullsizeoutput_2a.jpeg


Poached and Roasted Cauliflower

5440DC0C-564F-4AC8-8401-5788313A3F0D.JPG

Raise your hand if you love cauli!!!!! It is SO versatile! I've found lately that I have been more making things like Cauli rice and couscous, cauli patties etc... and tbh - I am SO sick of finding tiny cauliflower granules allllll over the kitchen haha. So I decided the other day I would try something different.  

Admittedly I got the idea from a lady at Wholefood Merchants in Ferntree Gully - and I tried it and thought... yeah not too shabby! BUT could be better! So I did a little tweaking ( I accidentally wrote twerking the first time haha ) and the end result is absolutely deliciously amazing.  

Because we are eating the whole cauli - Leaves and all! And yes, that includes the stalk! PLEASE buy organic!!!!!!!! The last thing you need is to be influxing your poor liver with chemicals and pesticides! So Please, buy organic. I'll say it one more time... Please! 

Now if you're a vegan and you miss cheese, I think you especially will love this recipe (please omit the ghee for a fat of choice like flaxseed oil) it kind of reminds me of cauliflower and cheese sauce from when I was younger - however since dairy is the devil, there's been a need to search for cheesy goodness elsewhere...without the food additives like the bio cheese or Daiya has!

So without further adue - here's introducing Nutritional Yeast! 

For those of you that haven't yet entered the realm of Nutritional Yeast, I highly recommend you do. ESPECIALLY if you have just come off dairy and are missing the cheesy goodness. It kind of reminds me of Parmesan... but without the ten day old dirty sock smell!  Nutritional Yeast is so good for you and contains some really essential vitamins and minerals. It is a really great protein, so fantastic for vegans and vegetarians alike, and especially good for those following a Ketogenic Paleo diet. And also has Magnesium, Copper and Manganese, Fibre, Thiamine, Riboflavin, Niacin, B6, Folate, B12, Zinc and Panthothenic Acid. <-- see, I used a big word so it must be good for you!

When it comes to your poaching liquid, make sure that the vegetable stock you use, actually contains vegetables. I have noticed some on the shelves lately that say things like "Extract"... um no mr marketing man! I want real vegetables in my stock please. If you can and you aren't too time poor (or perhaps you are super organised and have some pre made) make your own stock. It's an awesome way to utilize your left over fruits and veg and herbs and at least you know what's in it! 

So I realllllly think you will enjoy this recipe. It is beautiful as a main, although sometimes we have it as a side dish to a roast. It's super satisfying either way. 


13C892F5-C324-453F-B02A-54C3F92E9CB1.JPG

Recipe

Serves - 4 -

Time 1 hr 20 mins

What you need:

 1 Litre Vegetable Stock (pref. Organic) 

1 Large Cauliflower, leaves and stalk on 

3 Cloves Garlic 

3 Tablespoons Nutritional Yeast 

1 Tablespoon Ghee or Olive oil for Vegan/Plant Based

Salt and Pepper to taste 


What to do: 

Find a saucepan that your whole cauliflower fits in and put the cauli in. Cover with your Stock. If 1 litre of stock isn't enough to cover your cauli, then top up with some water. Bring to a boil, then once boiling, turn to a low heat and simmer for 30 minutes.  

Once finished poaching using tongs, carefully lift the cauliflower out of the liquid and place onto a baking sheet that has a layer of tin foil. Don't throw away the poaching liquid - you can put this in a container into the fridge and use it again another day.  

On your poached cauli, add your Ghee ( Or Olive Oil ) , Nutritional Yeast and your Garlic. Don't worry about rubbing it in, the residual heat and the oven will melt the ghee and it will soak into the nooks and crannies. Season lightly and then bring the foil up the sides of the cauli and wrap at the top (so none of the liquid drains) 

Place in the oven for 20 minutes on 180 degrees. Take out of the oven and remove from foil, pour the juices over the top of the cauli and place back in the oven, uncovered for another 20 minutes to brown.  Pull out from the oven after twenty minutes and serve. 

This really is a delicious way of serving Cauli - let me know what you think in the comments below! 


IMG_0197.PNG

Home Made Raw Vit C Powder

AFE5B520-D357-4350-AB86-179163E16047.JPG

If you have not gotten into the land of dehydrators.. seriously time to think about giving it a go! When something says its 'raw' it means it hasn't been heated above 40 degrees. Once foods are heated they begin to lose their nutrients, So dehydrators are magic ESPECIALLY if you wan't to make your own powdered supplements! ehydrators you can find for a pretty good price. I got mine off Catch of the Day for $49. I originally bought it for my mum and dad...and they liked it so much that she bought a bigger one...and then gave this back to me. 

am yet to make my own 'mean green' mix but am thinking I'll do it once the remaining oranges are out of the dehydrator tomorrow. You know you go to the super market or the health shop and buy spirulina powder or green smoothie powder??? Well you can make it at home and for a quarter of the price! It's the same with this Vitamin C.

The gut only has capability of absorbing so much at a time. So when ever you see a product that is claiming to have the vitamin c content of 1 million oranges in ONE tablet - it's a marketing gimmick. Your body can only absorb so much at a time and then you wee the rest out. So when possible, always try and make it yourself because you will get a bigger benefit from it as you won't be taxing your digestive tract as well. Seriously... imagine your gut being hit with 20 oranges! Poor bloody thing!

We will use this beautiful dehydrated orange in SO many things! In Smoothies in the morning, in brownies (Jaffa sweet potato brownies....ummmm I think that's happening this weekend FO' SHO') salad dressings... you name it! Even to just flavour some water for mini man. OMG you know what this is awesome in? Sparkling mineral water! Like fizzy orange goodness with no sugar or arse added. The possibilities are endless!

So yes. I decided to make my own. We always seem to get sick going from summer to autumn... or from winter to spring. Always when the weather changes. So this is perfect for this time of year given there is about 8 days left of winter. (I'm actually ugly crying right now and not on the inside)

This is super simple. I'm not even going to write a recipe below because thats stupid. It's oranges and a dehydrator. So instead of doing a recipe, I am just going to tell you what to do here.

604463F5-6223-4C54-9F0A-A35DDFB4F003.JPG

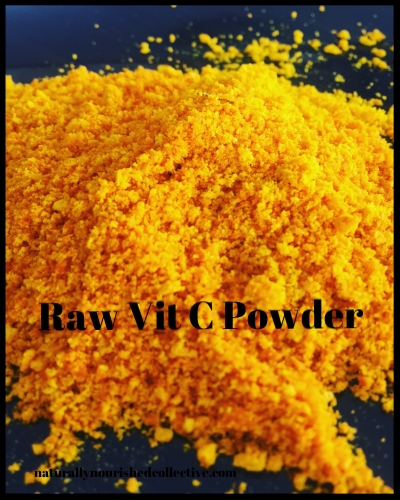
​First of all, make sure they're organic oranges! This Vit C powder is the orange skin AND the orange flesh. So since you will be consuming the skin it is seriously important that you only choose organic oranges. Now when you are peeling oranges to make this, its a bit fickle. You need to get the skin, but not the white bit underneath. The white of the orange is extremely bitter and while your powder will still be good for you... it will taste like arse. So be careful, take your time and just peel the orange off and leave the white behind. Once you've peeled all the skin off, cut the white bits off the orange and discard them. You'll be left with beautifully juicy orange flesh. Cut them thin. The thinner you cut them the quicker they will dehydrate. Layer them out in the dehydrator with the flesh toward the bottom of the dehydrator and the peel toward the top of the dehydrator. You can do as many oranges as you have room for in the dehydrator you have. I managed 5 oranges in mine. 

Don't set the temperature above 40 otherwise it starts to destroy the nutrients. ​

You just leave it until it is dry enough to process into a powder. The skin will dry first and the flesh will take a little bit longer. You can always turn the skin to powder first and then do the orange once thats completely dry. ​

In terms of turning it into a powder... there are a couple of ways. If you have a mortar and pestle... that's the best way. I sadly have misplaced mine. And by misplaced I mean dropped and smashed on the floor. So I did mine in my Nutri Ninja. It didn't give me as smooth of a powder as usual... but its still good and tiny. This picture makes the granules look bigger than they are because I zoomed in. ​

So seriously give it a go!​

COPY CODE SNIPPET
A0C31A7B-19C3-4967-8F18-C0E76852B338.JPG

To do the mean green mix, you dehydrate kale, spinach etc... all beautiful green things and then do the same thing to turn it into a powder. I will attempt that next so I'll keep you posted once I've done it! 

Happy dehydrating and if you do give it a go - let me know what you think and tell me how yours went! 

Peace love and vitamin C to you all xx


As you can see here, this one has a bit of white on it. I discarded it. I tried it before I got rid of it and I'm glad I did... in a weird way. It was SO bitter! My god. Would have completely ruined my mix!


IMG_0197.PNG

Spicy Tomato, Mushroom and Basil Quinoa Pasta

IMG_5877.JPG

As we near the end of winter, I find myself cooking as much comfort food as possible before the hot weather begins. To me, comfort food screams PASTA! Probably why I've blogged two pasta recipes in the same week. 

When I originally found out I was celiac.... I think I literally mourned the loss of normal pasta. That's not even joke. I was genuinely upset! That's quite amusing now that I look back on the time, because I found Quinoa pasta and I reckon without doubt it is soooo much more yummy! It has a sweeter flavour to it and I find it has a nice bite if its cooked properly. 

It has been so long since I've enjoyed a bolognese, and that was another thing I was really sad about when I stopped eating meat. Bolognese sauce. My god. That stuff goes good with everything. When I was younger and just moved out of home, I used to batch cook bolognese like it was going out of fashion. Sometimes I would cook that much of it that I'd run out of pasta. So I would use the sauce as a dip. Seems weird... but it will actually rock your world without word of a lie! Cucumber in particular is amazing! Especially if you cut a cucumber in half length ways and scoop out the seeds. It's like a little bolognese boat! Really good! Anyway! I'm getting off topic!

When the meat vanished from my life, I started to really search into how I can make delicious pasta sauces and to my amazement, there are SO many combinations you can do and so many amazing vibrant ways that you can flavour olive oil that makes pasta delicious! 

Once again, if you aren't good with Quinoa, then Sub for a different type of spaghetti like Zoodles. ORRRRR there is this brand of 'spaghetti' in the health food aisle at woollies ( I think the brand is slendier ) and the pasta is made out of Konjac which is a root vegetable. Keto lovers rejoice because its only 10 calories per serve which means it is SUPER low carb!

So on with it today (this is the second time I've written this recipe blog because the first time I accidentally deleted it) I really do hope you enjoy this recipe. It is one of my families faves!


RECIPE

What you will need:

1/2 Pack Organic Quinoa Pasta (or Pasta of choice... NO GLUTEN...naughty naughty)

Good Quality Olive Oil on hand

4 Organic Tomatoes Quartered

1 Field Mushroom cut Chunky.

6-7 Fresh Basil Leaves chopped (dried just simply won't do)

Chilli Flakes

1 Small Onion diced

2 Cloves Organic AUSTRALIAN Garlic (2 cloves to me is like a bulb)

1/2 tablespoon Ghee


What to do:

Heat your pan and melt your half tablespoon of ghee

Saute your onion until translucent. I know you normally add Garlic here, but adding it at the end means it isn't as heat treated which keeps some of the benefits intact. 

While the Onion is cooking, put your water for your pasta in the pot and bring to a boil. Don't forget to season the water!

Once the onion is translucent, add your diced tomatoes and mushrooms. Sauté until the tomatoes are starting to break up. Add a little bit of water to deglaze the bottom of the pan if the food starts to catch. 

Once your water is boiling, add the pasta. 

To your sauce, add your chili flakes. Let cook for a few minutes to wake up the chilli. 

Add Garlic. Let cook for a couple of minutes and then turn off the heat. 

Once the heat is turned off, mix through the basil and add your olive oil. Enough to make it a sauce.

Once pasta is cooked, using tongs lift the pasta from the water and place in the pan of sauce. Don't worry about getting all the water off the pasta as the starch will combine with the oil and make the sauce a bit thicker and glossy.

eason with Salt & Pepper

Toss and Serve!


IMG_0197.PNG